If you’ve been growing a ZZ plant for over a year, it might be time to move it to a new home. You see, with time, ZZ plants tend to become root-bound (or pot-bound). And when that happens, they are at a greater risk of diseases and stunted growth. The only solution to prevent that is to repot the plant.
But when exactly should you repot your ZZ plant? Here’s the short answer:
Generally, a ZZ plant needs to be repotted every 2-3 years. But instead of sticking to a rigid timeline, it is better to understand the signs and symptoms. They are:
- Roots protruding out of drainage holes,
- Roots coming out on the top of the soil,
- Slower growth.
Lastly, it is best to repot the plant during spring or early summer.
Repot a ZZ plant when its roots protrude out of drainage holes or come out on the top of the soil. It is ideal to repot it during spring or early summer, as it is easier for the plant to tolerate the transplant shock. A ZZ plant that needs repotting may also experience slower growth.
Even though this answer might seem enough, there’s much more to repotting a ZZ plant. Read along to find answers to all the questions related to repotting a ZZ plant, including when to do it, how to prepare for it, how to do it, and why it is important.
When to Repot a ZZ Plant?
The answer to “when to repot a ZZ plant” can be broken down into two sections:
Signs and Symptoms
The ZZ plant grows slowly, so you don’t need to repot it often. Its growth rate also varies depending on the environment, as it grows even slower in a home than in its natural habitat. Generally, a ZZ plant needs to be repotted every two to three years. This timeline works well for people who want to refresh the soil mix and replenish the nutrients.
But if your plant has become root bound, it’s better not to follow a rigid timeframe. Instead, you should read the signs and symptoms the plant is giving.
A ZZ plant will tell you it needs to be repotted in the following ways:
- The plant has become root-bound. It is the biggest sign that your ZZ plant needs a bigger home. When your plant becomes root-bound, its roots protrude from the drainage hole and the soil’s surface.
- Another sign of a plant becoming root-bound is that the roots will develop into a tight mesh around the soil inside the container, much like a mat of fibers. You won’t know it until you pull the plant out of the container.
- When a ZZ plant becomes root-bound, it grows slower than normal. If your plant is growing slowly, along with other symptoms mentioned above, it needs to be repotted.
If you stay mindful and observant, these signs will tell you when it’s time to repot your ZZ plant. However, repotting it in the right season can make all the difference. This brings me to the second point.
Right Season for Repotting
It may not always be possible, but repotting your ZZ plant during spring or early summer is better, as it is the “growing season” for a ZZ plant. Repotting during this time reduces the transplant shock the plant experiences.
Since it’s naturally growing during this time, it finds it much easier to continue its growth than if you were to repot it during extreme weather (winter and summer).
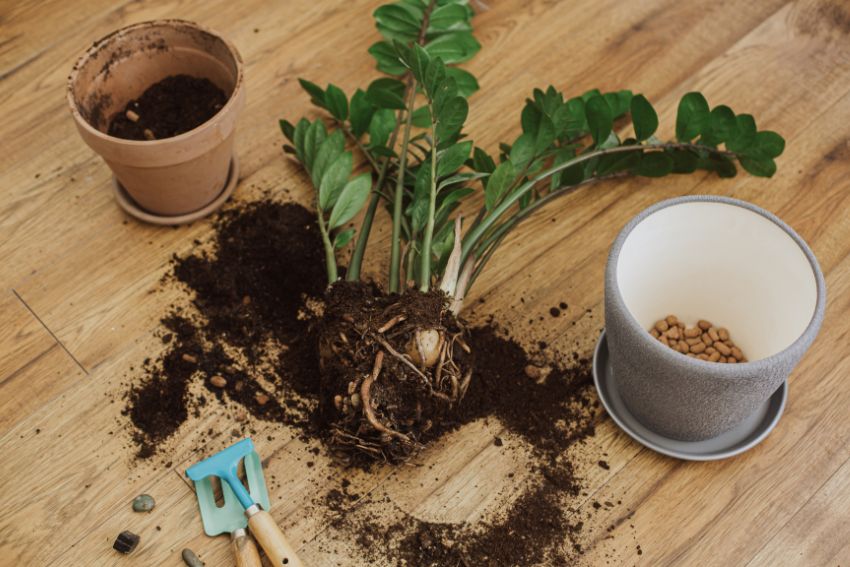
Repotting Prep
Before learning how to repot a ZZ plant, let’s learn how to prep for it.
Things You’ll Need
You’ll generally need the following things before repotting your ZZ plant:
- Fresh potting mix.
- A new container that is about 1-2 inches larger (in diameter) than the current container. The container should also have 1-2 drainage holes.
- Terra-cotta pots are preferable as they help dry out soil faster than ceramic or plastic pots.
- Newspaper or tarp to cover surfaces where you work.
- Gloves (disposable or gardening gloves) to protect your skin from the irritating sap of a ZZ plant.
- Sharp gardening snips or scissors to prune or cut pot-bound roots.
What About the Soil Mix?
Even though ZZ plants can tolerate different soils, your goal should be to grow them in a mix that helps them thrive!
Ideally, you should repot your ZZ plant in a fast-draining soil mix that can also hold nutrients and moisture. I prefer a potting mix of one-part perlite and one-part sand. Depending on the availability, you can replace perlite with pumice or wood chips.
As for the soil pH, it should be slightly acidic, ranging from 6.0 to 7.0.
Once you have made these preparations, you are ready to repot your ZZ plant.
How to Repot a ZZ Plant?
Repotting a ZZ plant can be broken down into a few easy-to-follow steps. But before discussing those steps, let me tell you a few tips that can help make the repotting process even easier.
Firstly, water your ZZ plant 2-3 days before repotting. It will loosen up the soil and make removing the plant from the pot easier. It will also help rhizomes store some water that will benefit the plant’s recovery after the repotting.
Secondly, you might be inclined to choose the biggest pot available, so you don’t have to repot often, but that would be a mistake. A needlessly large pot dries out the soil slowly, making the plant susceptible to root rot.
Let me now tell you the step-by-step process of repotting your ZZ plant:
Steps to Repot a ZZ Plant
- Start by spreading tarp or newspaper over the work area. It will protect the surface from soil and plant sap that can irritate the skin of people and pets.
- Wear gloves for protection against the irritating plant sap, especially if you have sensitive skin.
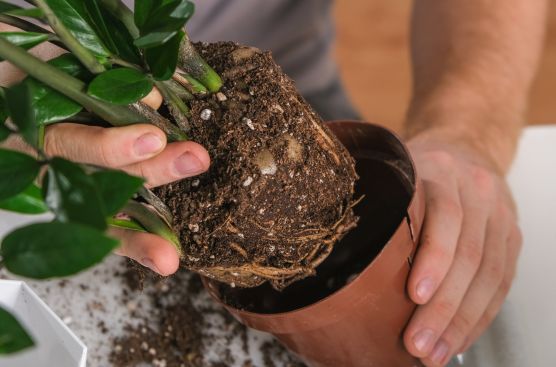
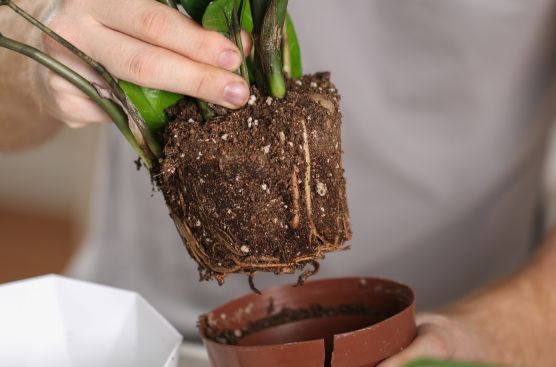
- Grab the ZZ plant around the base and gently pull the plant out of the pot.
- You can also turn the container upside down and tap on its sides to loosen the soil and help the plant slide out easier.
- Loosen the pot-bound roots with the garden snips and gently wash away the soil sticking to them.
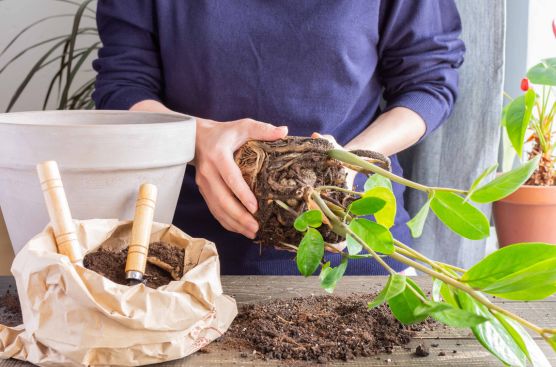
- Add a few inches of the fresh potting mix to the new pot.
- Place the plant in the new pot such that it is at the same height it was in the previous pot. Adjust the soil accordingly.
- Fill the pot around the roots with the remaining soil until the pot is filled.
- Stabilize the plant by gently tamping the soil and water lightly.
But What if You Don’t Have Any Extra Space?
Ideally, you should move your ZZ plant into a bigger pot when repotting. But sometimes, you might not have the space for a bigger pot. In that case, you may repot your ZZ plant in the same pot after reducing its size (through rhizome division).
Here’s how to do it:
Remove the plant from the old container and wash off excess soil from the roots. Your goal is to reduce the plant’s size by dividing the rhizomes.
Sometimes, the plant develops rhizomes loosely attached to the plant. If that’s the case, a quick cut will separate the smaller rhizome from the main plant.
If that’s impossible, and the rhizome has developed into a big potato-like structure, you’ll have to cut through it to divide the plant. Cut off the section you want to pot into the old pot with a sharp and sterile knife. This section should have a few stems growing out of it. Make sure that there is no sawing motion when cutting.
Let the divided section sit for a few hours before replanting. Fill the old pot with a fresh potting mix and plant this section. Make sure that it is roughly the same height as before. Fill in the remaining potting mix and tamp the soil.
As for the leftover rhizome divisions, you can either throw them out (if you lack space) or repot and gift them to friends and family.
Is Changing the Top Layer of the Soil Enough?
Some people might recommend you simply change the top layer of the soil instead of repotting the whole plant. Changing this top layer provides the plant with fresh nutrients, and it is useful for people who have an exceptionally large ZZ plant.
But you should know that this only works as long as your plant has not become root bound.
Generally, a large ZZ plant takes a long time to become root bound, but when it does, the only way to ensure its healthy growth will be to repot it into an even bigger container.
Caring for a Freshly Repotted ZZ Plant
Even a plant as hardy as a Zanzibar Gem can experience shock when repotted. Therefore, your goal should be to keep the changes to a minimum. Here’s how you can care for your freshly repotted ZZ plant:
- Place the new container in the same place as the old one.
- Ensure the same environment, temperature, sunlight, and humidity levels the older plant was used to.
- Only lightly water the plant after repotting, and let the soil dry out before the next watering.
- Do not fertilize the plant for at least two weeks after repotting.
Why Bother Repotting a ZZ Plant?-Benefits of Repotting a ZZ Plant
If a ZZ plant is so low-maintenance, why go through all this hassle to repot it?
Turns out, repotting a ZZ plant is not just about aesthetics. While some plants like to be root-bound, the ZZ plant is not one of them.
Here’s why:
Becoming root-bound or pot-bound is detrimental to the ZZ plant’s health. The absorption of water and nutrients becomes difficult when the roots are tightly packed. As a result, the plant experiences stunted growth and may even die if left that way.
The ZZ plant is also at a greater risk of diseases and pests when it is root-bound. Things like fungus gnats, mold, and root rot set in and can only be resolved by repotting the plant.
With time, the soil in the container also loses all the nutrients. It is one of the reasons why you see yellowing and drooping leaves on a ZZ plant that has not been repotted for a few years.
When you repot the plant in new soil, it gets access to fresh macro and micronutrients that are essential for its survival and growth.
Final Words
Once your ZZ plant starts showing signs of being root-bound, you should not waste any time repotting it. Repotting will only help it grow healthier and faster, and takes only a couple hours (even less if you’ve done it before).
The key is to use fast-draining soil and a pot at least 1-2 inches bigger (in diameter). Wear gloves if you have sensitive skin, and take the help of a partner if your plant is too big to handle alone.
FAQs
1.Can I repot my ZZ plant in winter?
A ZZ plant can be repotted in any season. But repotting in the spring or early summer is recommended (it is the plant’s growing season). During this time, the plant is much more capable of handling transplant shock compared to extreme temperatures (summer or winter).
2.Do ZZ plants like to be root-bound?
No, unlike some other houseplants, the ZZ plant does not like to be root-bound. When a ZZ plant becomes root-bound, it experiences stunted growth. A root-bound ZZ plant is also vulnerable to diseases, pests, mold, and root rot.
3.Why is my ZZ plant dying after repotting?
Your ZZ plant may die after repotting if you don’t ensure the following:
- Using a fresh mix of fast-draining soil (recommendation: 1 part sand and 1 part perlite).
- Ensuring that the new pot has at least 1-2 drainage holes.
4.Should I water my ZZ plant after repotting?
Yes, it is recommended to lightly water your ZZ plant after repotting. It helps stabilize the plant in new soil and helps the soil settle in the pot.
5.Do ZZ plants grow faster after repotting?
Repotting may help your ZZ plant grow faster for two reasons. Firstly, a root-bound ZZ plant finds it difficult to extract nutrients and moisture from the soil. Secondly, old soil also loses all its nutrients gradually. Repotting a ZZ plant into fresh soil solves both these problems, ultimately helping the plant grow faster.